


Photo by Jason Leung on Unsplash
Hello World Deep Learning Model
And how to apply it to a simple web app


Introduction
One day you wake up and decide to learn more about Artificial Intelligence. You are not a math expert, or a computer science PhD, but you want to understand what happens behind this things called "AIs". How do you start to learn? Well, in my case I decided to use free resources, and the first course I found was the Practical Deep Learning for Coders from fast.ai (course.fast.ai).
The first thing you will learn in this course is that you absolutely do NOT need to know a lot of math, because just high school math is enough. You do NOT need a PhD to start learning about deep learning (the course's teacher has some decades of experience in AI and has a degree in philosophy). And you do NOT need a lot of data to get good results (there are world class models that used small amounts of data).
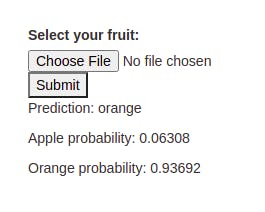
In this post I will describe how I created my first artificial inteligence web app. This is a very simple application. You just need to upload some photo and the model will classify it between orange and apple, and return the confidence it has on its own predictions. This is an example:
At little of jargon
Before proceding to the step by step, you should a least be familiarized with (or willing to learn) this things:
- Python programming language;
- Google Colab (Jupyter notebooks);
Python is a programming language widely used in data science (and lot of apps too), that is very begginer friendly. We will use it to build our deep learning model and to build our Web App too. Google Colab is a free service that basically hosts a computer for you to use Jupyter notebooks. "But what are Jupyter Notebooks?" you say. It is an application that lets you write Python code along with formatted text (its like a Word/Google Docs on stereiods). You are able to run Jupyter Notebooks on your own machine, but this is not the scope of this post.
Creating the deep learning model
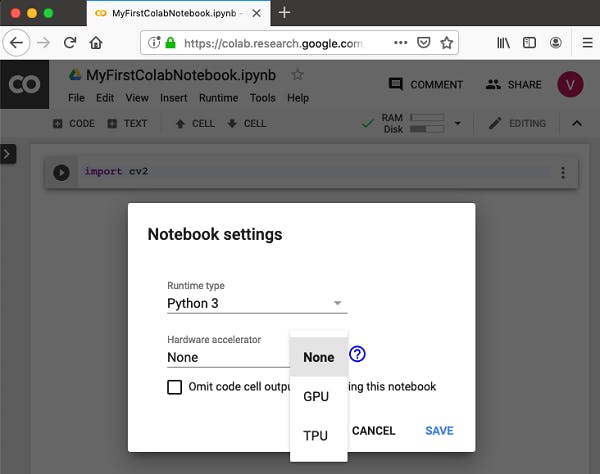
I expect you to have a clean new Colab notebook open right now. Throughout this section I will expose the steps I use to create my first model and what each part means. Before proceding, make sure to enable the GPU in your colab notebook like in the next image:
Imports and setup
The first code we need is to install and import the libraries we will use to create our model. This code install, import and setup the "fastai" library in our notebook:
# fastai
!pip install -Uqq fastbook
import fastbook
fastbook.setup_book()

from fastbook import *
from fastai.vision.widgets import *
Another library we will use is the DuckDuckGo (unofficially) API to search images:
# DuckDuckGo search api (unofficially)
!pip install duckduckgo-images-api

from duckduckgo_images_api import search
Data collection
This step is where we collect our dataset, in other words, we download the images from apples and oranges. First we define our "fruits_type" that is the list of fruits we are working with, you can add more fruits to the list at the expense of increasing time to download the images. For each fruit that we defined, we will create a folder inside the folder "fruits", search in the DuckDuckGo API for the URLs of the images and then download them. By default, the DuckDuckGo API returns 100 images, so in our first model we will have 100 images of apples and 100 images of oranges to train our deep learning model.
Here is the code:
# Download the images
fruit_types = 'apple','orange'
path = Path('fruits')
if not path.exists():
    path.mkdir()
for o in fruit_types:
    dest = (path/o)
    dest.mkdir(exist_ok=True)
    results = search(f'{o} fruit')
    images = [r["image"] for r in results["results"]]
    download_images(dest, urls=images)
Even if we downloaded the images from the DuckDuckGo, there are some image URLs that could be corrupted, or unable to be used like an image. To check and remove this images, we will use the following code:
# Remove corrupted image files
fns = get_image_files(path)
failed = verify_images(fns)
failed.map(Path.unlink)
This step of data collection is very important to the quality of our model. If we have bad data, our model will not perform very well. Even if we do not need to collect massive amounts of data to get good results, it is a critically part when designing and creating deep learning models, so is healthy to spend some time in it.
Model training
Now that we have a useful dataset, lets train our model. The following code is a definition of our model's configuration.
# Configuration (hyperparameters)

fruits = DataBlock(
    blocks=(ImageBlock, CategoryBlock),
    get_items=get_image_files,
    splitter=RandomSplitter(valid_pct=0.2, seed=42),
    get_y=parent_label,
    item_tfms=RandomResizedCrop(224, min_scale=0.5),
    batch_tfms=aug_transforms())
The first part with blocks=(ImageBlock, CategoryBlock) is a way to tell fastai (the library we are using to create and train our model) what is the type of data we are working with. In this example we are working with images and these images are classified into categories (in this case, orange and apple).
The line with get_items=get_image_files is a way to tell fastai how to get the list of items we will use in the training. In our case, the "get_images_files" method from fastai will get the path of some folder and list all the files in that folder recursively (recursively, by default).
We also need to tell fastai how to split up our dataset, and that is what we are doing in this line: splitter=RandomSplitter(valid_pct=0.2, seed=42). When training our model, usually we split the training data from the validation data. The training data is used by the model to "learn" and the validation data is used to evaluate the predictions made by the model. In this line we are separating 20% of our dataset to be used as the validation set. The "seed" parameter is a way to aways use the same "random" data as the dataset, even if we run our training multiple times. This ensures that if our model performance changes, it is not due to validation dataset changes.
The next configuration get_y=parent_label tells how we are going to get the "dependent variable", in other words, how we know the correct name of the photos in the dataset. In our example, the name of the folder that the image is located represent the name of that fruit.
We can also request our model to apply some transformations in our images. The line item_tfms=RandomResizedCrop(224, min_scale=0.5) tells the model that it should crops the image in a square of 224x224 pixes each epoch (aka when the model pass through the entire training dataset).
Finally, the line batch_tfms=aug_transforms() request that our model apply some another transformations in batches. These transformations run faster because thay can be executed in the GPU in parallel. Here we are applying a concept of "data augmentation" to our dataset. It means that we are creating a lot of randomized variations of each image in our dataset, like flipping, rotating, brightness changes, etc. It is very useful to help our model generalize the concept of each fruit. For example, even if our apple is upside down, it is still an apple!
The previously code explanation was pretty extensive, because it was the part where we make a lot of decisions that could impact the quality of our model. To train the model itself, just run the following code:
dls = fruits.dataloaders(path)
learn = cnn_learner(dls, resnet18, metrics=error_rate)
learn.fine_tune(4)
Usually, we need to wait some good amount of time to let it finish.
After it finish, run the following code:
interp = ClassificationInterpretation.from_learner(learn)
interp.plot_confusion_matrix()
It will print something like this image:
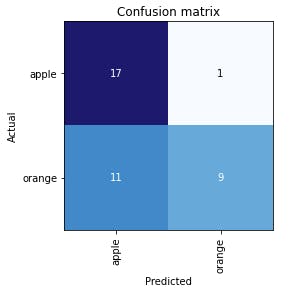
This is called "confusion matrix", and represents (in a matrix) the predictions made by the model vs the actual correct answers. The numbers in the diagonal of the matrix represents the successful predictions, and the other numbers are the "confusion", or the mistakes of our model. In a perfect world, we should have zeros in the squares off diagonal. If your matrix is far from the perfect world (like mine), you could evaluate the photos that are being used to train our model and see if they are really good examples of apples and oranges, and remove the photos that you think are not good examples. After cleaning your dataset, you should run all the code of the section "Model training" again.
When you get satisfied with your results, you can export your model with the following code:
learn.export()
It will create a file "export.pkl" in the files section of your Colab notebook. Download it and proceed to next section.
Creating the web app
The steps I will show here to create a web app are not the same in the fastai course, but it is very simple. From now on, the code and commands I will show here should be executed on your local machine with Linux (preferably Ubuntu).
Project configuration
Make sure that you install Python on your machine running the following commands in your terminal:
sudo apt install -y python3-pip
sudo apt install -y python3-venv
sudo apt install -y build-essential libssl-dev libffi-dev python3-dev
With everything installed, create the folder you will store all the code for our web app and enter it. I created a folder called "fruits-classifier":
mkdir fruits-classifier
cd fruits-classifier
In this folder you just created, move the "export.pkl" that you have downloaded in the previously section.
Now we should create an Python environment to make sure our project libraries do not interfere with the Python libraries we have on our machine. Inside that folder, create the Python env with this:
python3 -m venv .env
Now, everytime you enter this project you should run this command to enable the Python env:
source ./.env/bin/activate
Create a file named "requirements.txt" and put the following content:
-f https://download.pytorch.org/whl/torch_stable.html
torch==1.8.1+cpu
torchvision==0.9.1+cpu
fastai>=2.3.1
Flask
Jinja2
gunicorn
flask_cors
It is the definition of libraries we will use in our project. To install these libs, run this command:
pip install -r ./requirements.txt
Web app code
Let's code our web app now. Create a file called "app.py" and open it in your favorite text editor (like VS Code). First of all, put the imports at the start of the file:
from flask import Flask, request, jsonify, render_template
from fastai.vision.all import *
from PIL import Image
from flask_cors import CORS,cross_origin
import os
In this project we will be using the Flask librarie to run our web app. To create the Flask app and configure it, just put this code after our imports:
app = Flask(__name__)
CORS(app, support_credentials=True)
The next code is responsible to load our model once our web app is running:
learn = load_learner(Path()/'export.pkl')
classes = learn.dls.vocab
After it, lets code a method to receive a image file and return the model's predictions:
def predict(img_file):
    img_decoded = tensor(Image.open(img_file))
    prediction = learn.predict(img_decoded)
    probs_list = prediction[2].numpy()
    return {
        'category': classes[prediction[1].item()],
        'probs': {c: round(float(probs_list[i]), 5) for (i, c) in enumerate(classes)}
    }
To expose our model to the web, we need to route the request receive to our server (using Flask librarie). To make that, create the following method:
@app.route('/',methods = ['POST', 'GET'])
def predict_html():
    if request.method == 'POST':
        img_file = request.files['img']
        return render_template("index.html", result = predict(img_file))
    return render_template('index.html')
To start our web app, just make sure to add the following code at the end of the file:
if __name__ == "__main__":
    app.run(debug=True)
Did you note that in the method "predict_html" we are loading a HTML file called "index.html"? It is our user interface. To create it, you should make a folder called "templates", create a filex "index.html" inside it and paste the following code:
<!DOCTYPE html>
<html>

<head>
    <title>Fruits Classifier</title>
    <meta name="viewport" content="width=device-width, initial-scale=1.0">
    <link href="http://netdna.bootstrapcdn.com/bootstrap/3.0.0/css/bootstrap.min.css" rel="stylesheet" media="screen">
    <style type="text/css">
        .container {
            max-width: 500px;
            padding-top: 100px;
        }
    </style>
    <script>

    </script>
</head>

<body>
    <div class="container">
        <form action="/" enctype="multipart/form-data" method = "POST">
            <label for="img">Select your fruit:</label>
            <input type="file" id="img" name="img" accept="image/*">
            <input type="submit">
        </form>

        {% if result is defined %}
            <p>Prediction: {{ result['category'] }}</p>
            <p>Apple probability: {{ result['probs']['apple'] }}</p>
            <p>Orange probability: {{ result['probs']['orange'] }}</p>
        {% endif %}
    </div>
    <script src="http://code.jquery.com/jquery-1.10.2.min.js"></script>
    <script src="http://netdna.bootstrapcdn.com/bootstrap/3.0.0/js/bootstrap.min.js"></script>
</body>

</html>
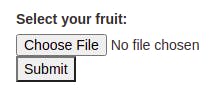
With all that said, lets run our app! Inside your terminal, run this command:
gunicorn app:app
It will print a URL. Open your browser and navigate to it. You will see a very simple interface like the following image:
Conclusion
Congratulations! Now you have a simple AI application to call yours :) If you have any questions and suggestions, feel free to reach me out here: linkedin.com/in/aleph-santos-oliveira